
As the title might suggest, in this post I will show you how I host static files for free (or at least for cheap, if you want to host lots of files) with Backblaze B2 and Cloudflare.
Backblaze B2
B2 is a service from Backblaze providing object storage, similar to S3 from Amazon. However, it is way cheaper than S3 and B2 even allows you to host up to 10GB for free, and after that it’s $0.005 per GB and Month. Downloads cost $0.01 per GB, but I’ll show you a way to work around that 😉
To get started with B2, sign up at backblaze.com/b2/sign-up.html, login and head to the “Buckets” section. Create a new bucket, give it a unique name and set it to public. This makes all files in the bucket accessible without authentication, so only store files you truly want to be public! After creating the bucket, head to the CORS rules for the bucket and set the rules to “Share everything in this bucket with every origin”.
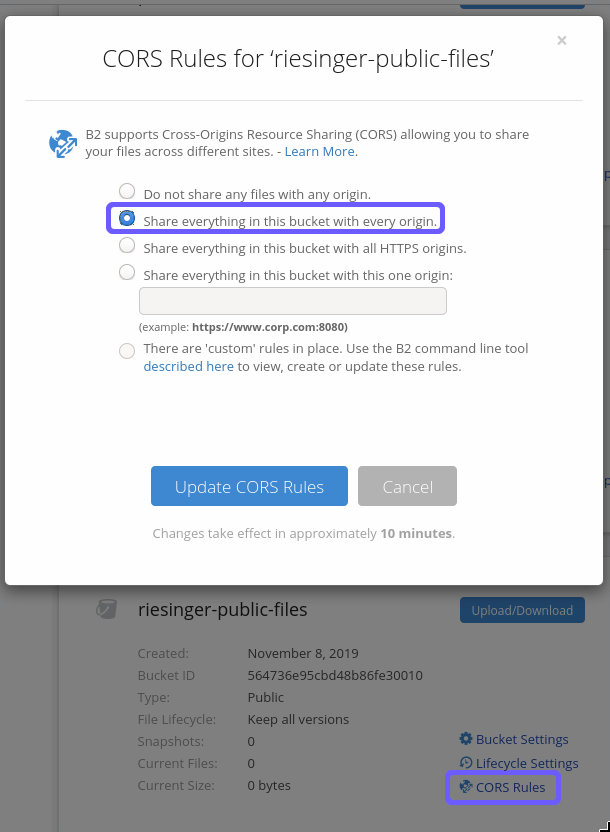
This will make the files in the bucket accessible from everywhere.
Now use the “Upload/Download” button to upload one file (it can be anything you want). Click the file name and you should see the following:
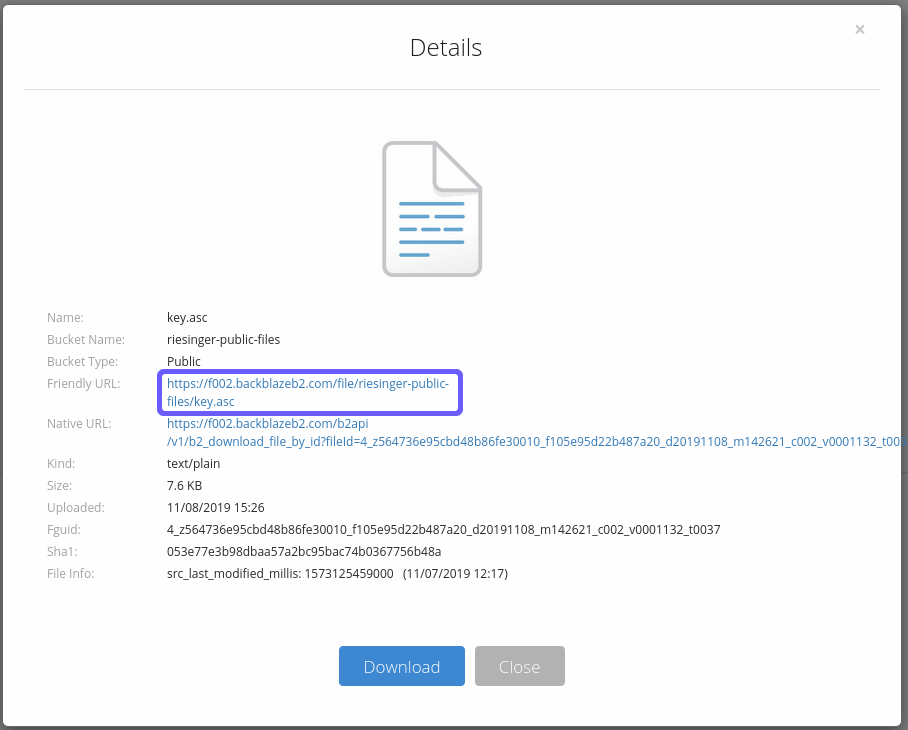
Verify that you can access the file by clicking the “Friendly URL”. That’s basically it! If this is enough for you and you don’t want to use cleaner URLs on your own domain, you can stop reading right now and start uploading those 10GB of files you want to share. Note that you will have download costs though!
Custom domain with Cloudflare
Look, those B2 URLs aren’t particularly beautiful, are they? But we can improve this! If you used the Internet enough, you’ve probably heard of Cloudflare. It’s hard to describe what exactly they do, because they offer lots and lots of cool things like DNS, TLS, DDoS protection, Caching, a CDN and many more things. But what’s even better is their really generous free tier which gives us access to all the tools we need to make those file URLs look better.
So go ahead and sign up for a free Cloudflare account at cloudflare.com. After that, add your domain to Cloudflare (I assume you already own one) by changing your DNS servers to theirs.
Afterwards, go to your DNS settings and add a new record. It should have a type of CNAME, the name
is the subdomain of your choosing and the target must be the B2 host. You can find it in the
“Friendly URL” of any file in your bucket.
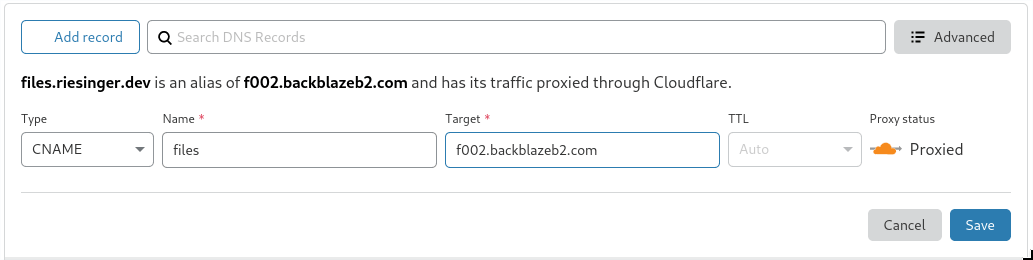
Make sure that the little cloud is orange and the proxy status is “Proxied”. This will save you money for reasons I will explain later. Leave the TTL field on auto.
You should now be able to access the file you uploaded earlier at
https://your.domain/file/<bucket_name>/<file_name>. This is an improvement already, isn’t it?
I told you that you’d be saving money by making sure traffic gets proxied through Cloudflare. You might be wondering why that is the case, so here’s why. First of all, proxying the traffic through Cloudflare enables us to use their Edge Cache (which we’ll setup in a moment). This means that Cloudflare will only request the file from Backblaze every now and then (configurable), not every time a user tries to access it. The second reason why this saves money is that both companies are a part of the so-called Bandwidth Aliiance. This means that all traffic from B2 to Cloudflare is totally free! Remember that $0.01 download fee per Gigabyte that I talked about earlier? You can forget that right now!
Congratulations you’ve reached the point of zero cost for storing up to 10GB of data online 🎉
Proxying traffic through Cloudflare has one more benefit on top of the waived download fees. Once a file is downloaded through Cloudflare for one location, it will be cached there for a configurable amount of time. This means faster downloads from every region of the world, since Cloudflare’s CDN is one of the largest available.
To optimize caching even more, head to the “Page Rules” section in Cloudflare and create a new one.
In the URL field, enter https://files.your.domain/*, assuming files is the subdomain you chose
earlier.
Then add (at least) the following settings:
- Edge Cache TTL: This configures how long Cloudflare should save the file in their Edge Cache before downloading it from B2 again. Set it as high as you can afford for maximum performance.
- Browser Cache TTL: This will add caching instructions to your user’s browser. Since you’re serving static files, you will probably want to set this to a high value.
- Cache Level: You can configure with which heuristics the cache should work. Do not set it to “Bypass”, because this will disable caching. Again, since you’re serving static files, you’ll want to set it to “Cache Everything”.
You can learn more about page rules in the Cloudflare documentation.
Prettier URLs with Cloudflare workers
Having your own domain for serving files is cool and all, but do your users really care about which bucket the file is in? Probably no. So why include it in the URL when you can remove it for free with Cloudflare workers.
Cloudflare workers basically allow you to run custom code (in JavaScript or WebAssembly) for every request to a configurable domain (or subdomain). This is perfect for our use case! To get started, head to the “Workers” tab in the Cloudflare dashboard and follow the link to the new workers dashboard (when you’re reading this, the new dashboard might already be the standard one). When setting up your first worker, it will ask you for a domain name to use for them. Choose one that you like, continue, choose the basic/free plan and continue again. Now you should see a button to create a new worker.
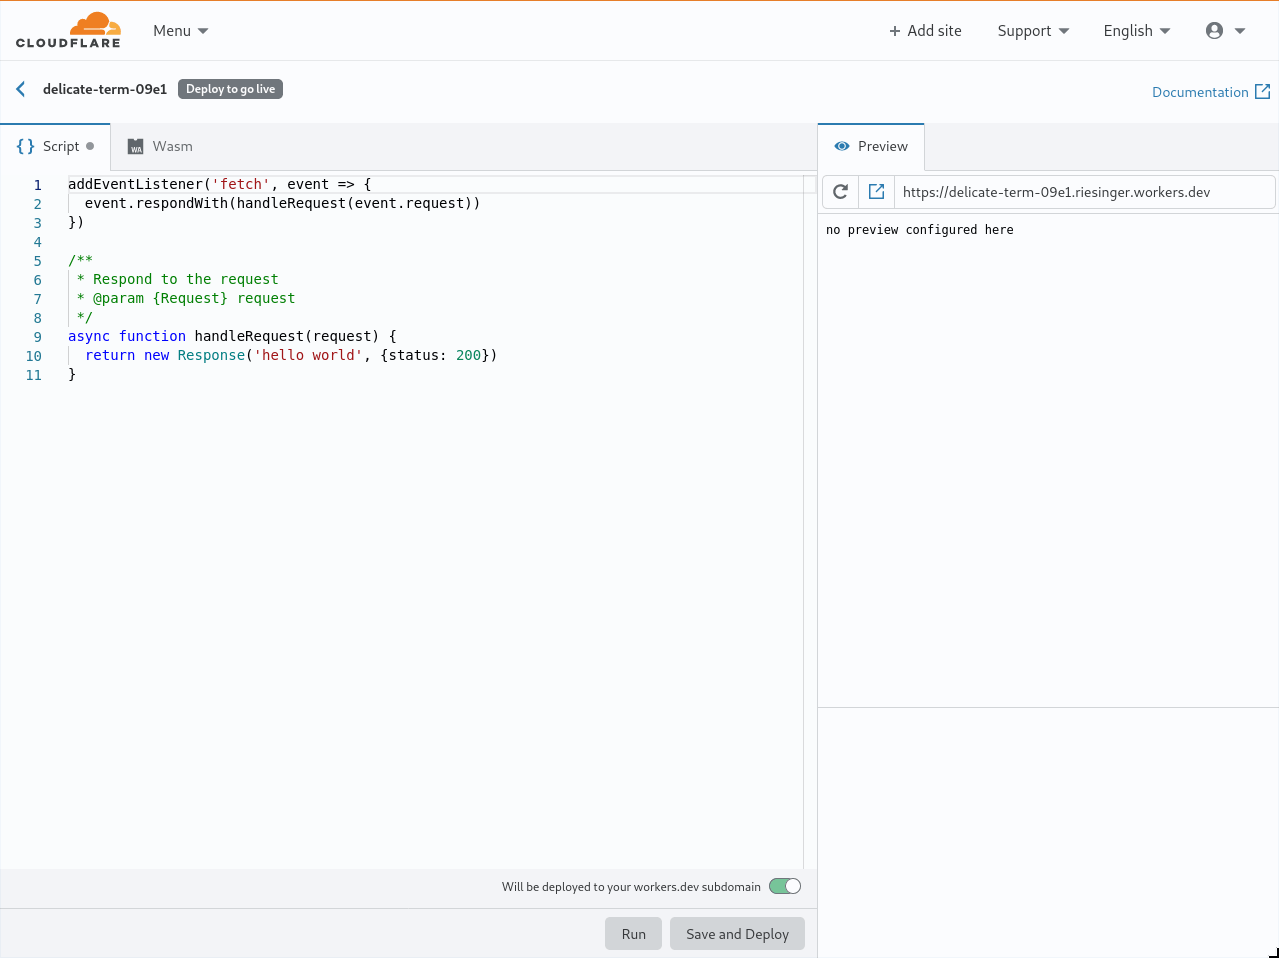
Now enter the following JS code into the code pane:
"use strict";
const b2Domain = "files.riesinger.dev"; // configure this as per instructions above
const b2Bucket = "pr-website-public-files"; // configure this as per instructions above

const b2UrlPath = `/file/${b2Bucket}/`;

addEventListener("fetch", (event) => {
  return event.respondWith(fileReq(event));
});

// define the file extensions we wish to add basic access control headers to
const corsFileTypes = ["png", "jpg", "gif", "jpeg", "webp", "webm", "svg"];
// files with these extensions should not be cached
const noCacheFileTypes = ["asc"];

// backblaze returns some additional headers that are useful for debugging, but unnecessary in production. We can remove these to save some size
const removeHeaders = [
  "x-bz-content-sha1",
  "x-bz-file-id",
  "x-bz-file-name",
  "x-bz-info-src_last_modified_millis",
  "X-Bz-Upload-Timestamp",
  "Expires",
];
const expiration = 31536000; // override browser cache for images - 1 year

// define a function we can re-use to fix headers
const fixHeaders = function (url, status, headers) {
  let newHeaders = new Headers(headers);
  // add basic cors headers for images
  if (corsFileTypes.includes(url.pathname.split(".").pop())) {
    newHeaders.set("Access-Control-Allow-Origin", "*");
  }
  // override browser cache for files when they were found
  if (status === 200) {
    // Force a cache duration of one minute for files with an ending of noCacheFileTypes
    if (noCacheFileTypes.includes(url.pathname.split(".").pop())) {
      newHeaders.set("Cache-Control", "public, max-age=1");
    } else {
      newHeaders.set("Cache-Control", "public, max-age=" + expiration);
    }
  } else {
    // only cache other things for 5 minutes
    newHeaders.set("Cache-Control", "public, max-age=300");
  }
  // set ETag for efficient caching where possible
  const ETag =
    newHeaders.get("x-bz-content-sha1") ||
    newHeaders.get("x-bz-info-src_last_modified_millis") ||
    newHeaders.get("x-bz-file-id");
  if (ETag) {
    newHeaders.set("ETag", ETag);
  }
  // remove unnecessary headers
  removeHeaders.forEach((header) => {
    newHeaders.delete(header);
  });
  return newHeaders;
};

async function fileReq(event) {
  const cache = caches.default; // Cloudflare edge caching
  const url = new URL(event.request.url);
  // This adds the /file/<bucket-name> path to the url
  if (url.host === b2Domain && !url.pathname.startsWith(b2UrlPath)) {
    url.pathname = b2UrlPath + url.pathname;
  }
  let response = await cache.match(url); // try to find match for this request in the edge cache
  if (response) {
    // use cache found on Cloudflare edge. Set X-Worker-Cache header for helpful debug
    let newHdrs = fixHeaders(url, response.status, response.headers);
    newHdrs.set("X-Worker-Cache", "true");
    return new Response(response.body, {
      status: response.status,
      statusText: response.statusText,
      headers: newHdrs,
    });
  }
  // no cache, fetch image, apply Cloudflare lossless compression
  response = await fetch(url, { cf: { polish: "lossless" } });
  let newHdrs = fixHeaders(url, response.status, response.headers);
  response = new Response(response.body, {
    status: response.status,
    statusText: response.statusText,
    headers: newHdrs,
  });

  event.waitUntil(cache.put(url, response.clone()));
  return response;
}
This will allow us to use URLs like https://files.your.domain/image.png instead of
https://files.your.domain/file/<bucket_name>/image.png, as well as removing some unnecessary
headers and force-disabling cache for some file types (I use this for my GPG key).
Once you’re done modifying the b2Domain and b2Bucket, as well as the extensions in
noCacheFileTypes, click the “Save and Deploy” button. The name of the worker doesn’t matter, but
if the default name bothers you, you can change it by clicking the text to the right of the back
button.
After deploying the worker, go back to the “Workers” tab on the main Cloudflare dashboard and add a
route. As with the page rule, the route is something like https://files.your.domain/*. Select the
worker you just deployed from the dropdown and that’s it!
You should now be able to access your files at https://files.your.domain/image.png or alike! 🚀
I hope you enjoyed this post. If you have feedback, just ping me on Twitter or contribute to this website on Github.