
I love offline media. I’ve always had issues with streaming services and linear television. For example, you’re watching a show, get to the third season and boom, the show is removed from Amazon Prime, Netflix or your favorite service. And don’t get me started with TV, where you have to adjust your schedule around the program, if you want to watch a specific movie or follow a show.
So what’s the solution? Keeping your media offline and hosting your own media server. Now, aside from the effort of hosting the server (which is actually quite minimal), there’s another issue: storage space.
While a few Terabytes will be enough for your server in the beginning, once you start ripping multiple series of a show, you’ll see how quickly the episodes pile up. Now, buying additional hard drives is always an option, but what if there’s a cheaper way to fit some more shows onto your server?
Let me introduce you to the world of transcoding.
What is this “transcoding”?
The word transcoding describes itself quite well, if you split it into its two components: trans and coding. Let’s first explain coding. As you might have guessed, your movies and TV shows need to be encoded into bits somehow to be stored on your hard drive. The instructions on how to code the movie to bits and bytes and how to decode them again are called a codec. Now, the trans part of transcoding is quite easy: You read the content of your media file with one codec and then “transfer” or re-encode it with a different codec.
Since codecs evolve over time, it might make sense to transcode your media from time to time. Since newer codecs usually should be more space-efficient, you could save quite a lot of space by doing so. For example, after transcoding my library from various mixed codecs to H.265/HEVC, its size shrunk from about 4.2TiB to about 3.1TiB, which roughly is a 25% reduction.
Also, having all your media files in one format just feels nice 😜
Getting started with Unmanic
Now that you’re hopefully sold on the idea of transcoding your whole media library, you probably think that that will be a huge endeavor. Let me introduce Unmanic, which is an amazing piece of software created by Josh Sunnex. It basically allows you to transcode & transform your whole library automatically by configuring your target state once and then just letting it go ham on your files.
Before you start Unmanic, make sure your media is backed up. It should be anyway. I’m not responsible for any files you loose by following this post.
Since we’ll want to use hardware transcoding, a GPU driver needs to be installed on your machine. Refer to your distributions’ documentation on how to install VA-API support. Usually you’ll just need the mesa drivers (on Debian, that’s just an apt install mesa-va-drivers away). Also install the package that provides the vainfo tool next (again, for Debian that’s apt install vainfo).
Once you run sudo vainfo you should receive an output similar to this one:
error: XDG_RUNTIME_DIR not set in the environment.
error: can't connect to X server!
libva info: VA-API version 1.10.0
libva info: Trying to open /usr/lib/x86_64-linux-gnu/dri/radeonsi_drv_video.so
libva info: Found init function __vaDriverInit_1_10
libva info: va_openDriver() returns 0
vainfo: VA-API version: 1.10 (libva 2.10.0)
vainfo: Driver version: Mesa Gallium driver 20.3.5 for AMD Radeon(TM) Vega 8 Graphics (RAVEN, DRM 3.41.0, 5.13.19-3-pve, LLVM 11.0.1)
vainfo: Supported profile and entrypoints
      VAProfileMPEG2Simple            :	VAEntrypointVLD
      VAProfileMPEG2Main              :	VAEntrypointVLD
      VAProfileVC1Simple              :	VAEntrypointVLD
      VAProfileVC1Main                :	VAEntrypointVLD
      VAProfileVC1Advanced            :	VAEntrypointVLD
      VAProfileH264ConstrainedBaseline:	VAEntrypointVLD
      VAProfileH264ConstrainedBaseline:	VAEntrypointEncSlice
      VAProfileH264Main               :	VAEntrypointVLD
      VAProfileH264Main               :	VAEntrypointEncSlice
      VAProfileH264High               :	VAEntrypointVLD
      VAProfileH264High               :	VAEntrypointEncSlice
      VAProfileHEVCMain               :	VAEntrypointVLD
      VAProfileHEVCMain               :	VAEntrypointEncSlice
      VAProfileHEVCMain10             :	VAEntrypointVLD
      VAProfileJPEGBaseline           :	VAEntrypointVLD
      VAProfileVP9Profile0            :	VAEntrypointVLD
      VAProfileVP9Profile2            :	VAEntrypointVLD
      VAProfileNone                   :	VAEntrypointVideoProc
Your output will vary based on your GPU and the codecs it supports. What’s important is that it supports the VAProfileHEVCMain. That’s the profile used to decode & encode HEVC/H.265 video.
Now, since Unmanic is distributed in a Docker container, getting started with it is rather simple.
Assuming you use docker-compose (or docker compose) — and you really should, if you’re not — you can use this docker-compose.yaml for starting your very own instance of Unmanic:
version: "3"

services:
  unmanic:
    image: "josh5/unmanic"
    env:
      PUID: "1000"
      PGID: "1000"
    volumes:
      - unmanic:/config
      - /path/to/your/media/:/library
      - /path/to/a/fast/disk/:/tmp/unmanic
    devices:
      - /dev/dri/:/dev/dri
    restart: unless-stopped
    ports:
      - 8888:8888

volumes:
  unmanic:
You’ll need to modify two of the volumes in the example however. The one in line 11 should link your media folder to /library inside the container. In case you store movies and shows on different paths, you can just add multiple volumes and link them to directories inside /library, like /library/movies. The volume defined in line 12 is for a fast transcode cache. It should have space for your largest media files multiplied by the amount of workers you’re going to choose (typically not more than 3) and should preferably reside on an SSD, but at least on some different HDDs than your main media storage. Unmanic will write the output files to this location and them move them back to your library (it cannot read and write the source media files at the same time, obviously).
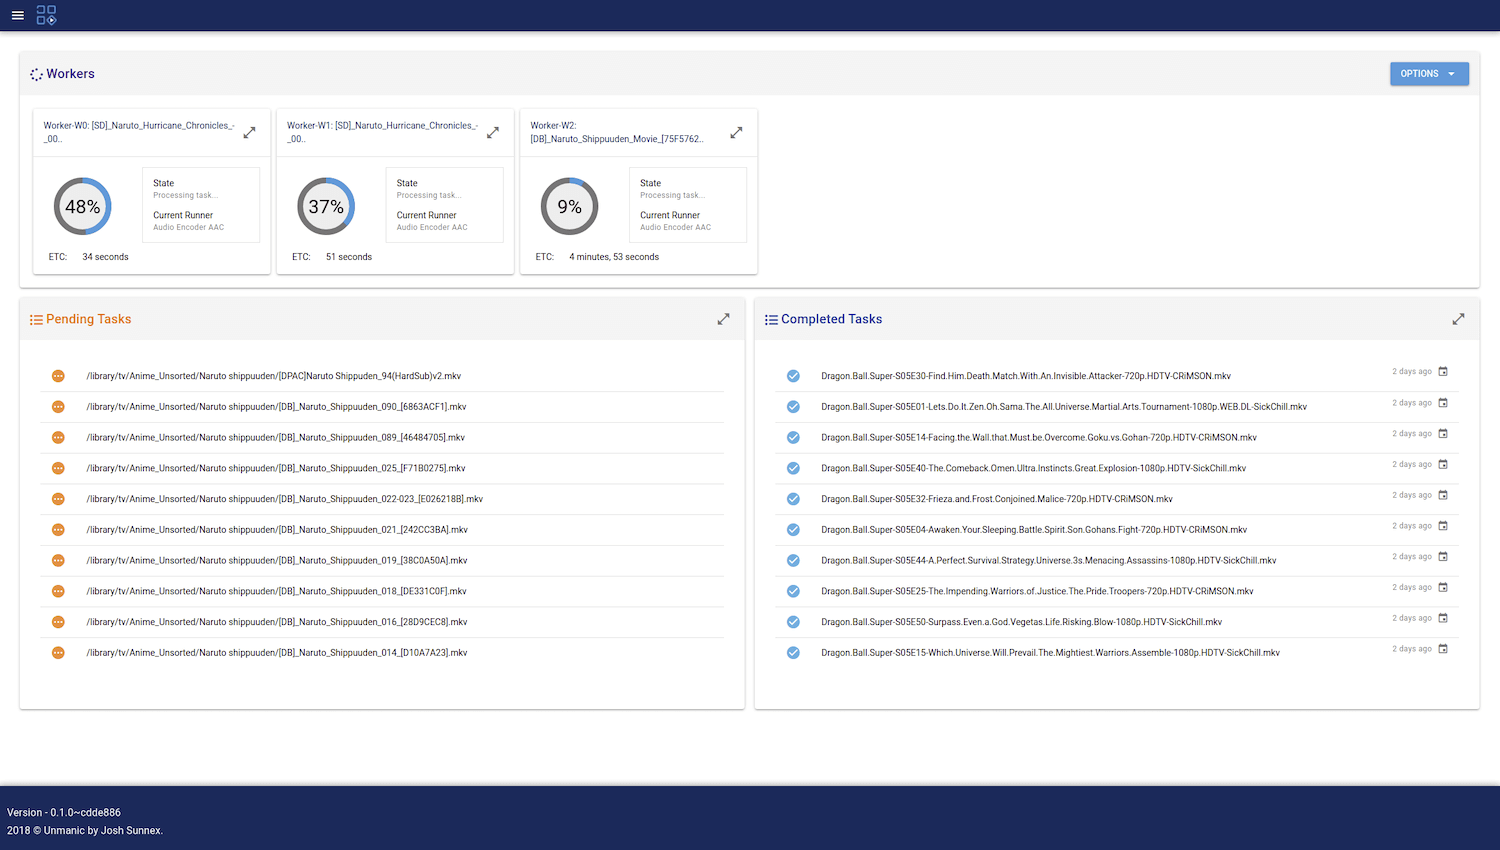
If you now head to your server’s IP address on port 8888 in your browser, you should see the
Unmanic dashboard, like shown in the screenshot above (obviously without any data in it).
Now, open the “hamburger” menu on the left of your screen and jump into the settings. There will be four main sections of which the first three are relevant for us. Under Library you can configure settings related to your media library. You’ll need to configure your library path to be at /library, if you’re using the docker-compose.yaml file I provided. The rest of the settings can be left on their default value or configured by you, depending on your needs. These will configure how often Unmanic will scan for new media files. Make sure to make liberal use of the Submit button at the bottom of the settings page. Otherwise your changes won’t be persisted.
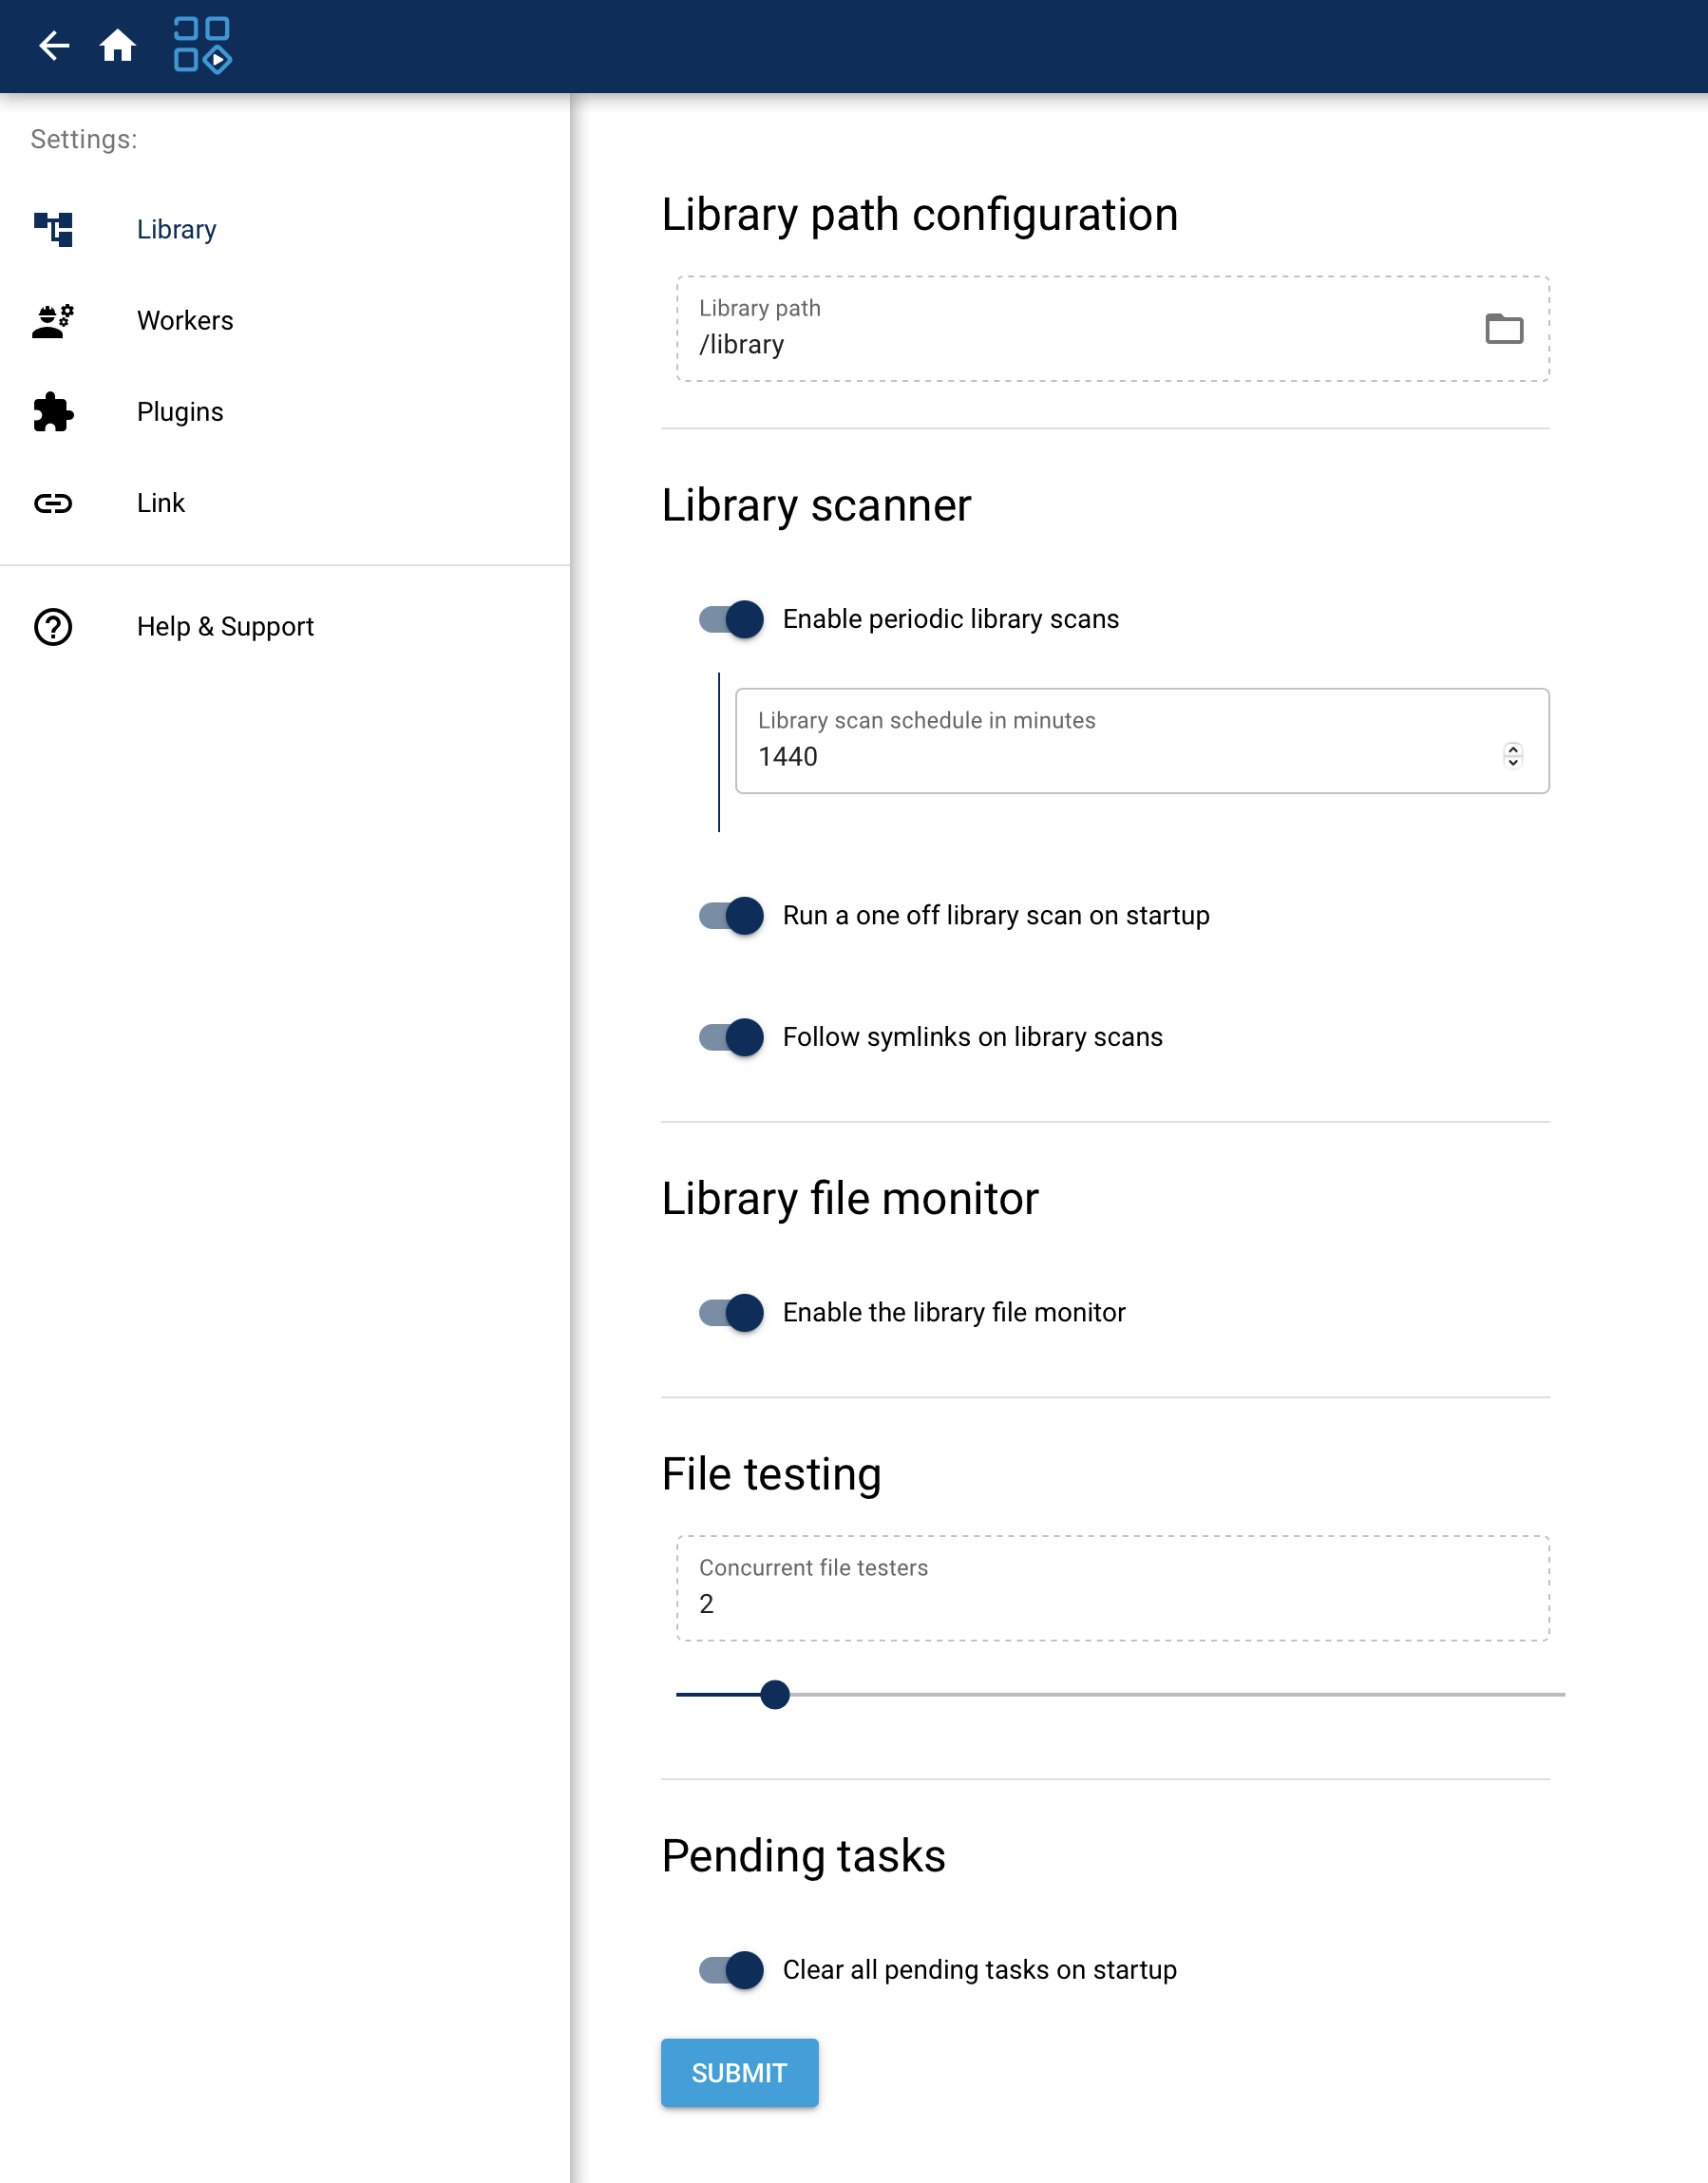
Library settings, as in my configuration
On the Workers page you can configure the number of workers for simultaneous transcoding of multiple files. There’s no silver bullet here, you’ll need to find out what works best on your machine on your own. Note that more workers aren’t necessarily better. I’ve found 2-3 workers to be optimal in my case, but this depends on the speed of your media storage, your cache, your CPU and GPU, so for a start, you can just leave it as it is.
The Plugins section is where you configure how you’d like your media to be encoded. Every processing step in Unmanic is implemented as a plugin, so there are ones for handling video transcoding, audio transcoding, subtitle removal and other post-processing steps. Head to the section and click the “Add new” button. Use the search bar to search for hevc_vaapi and download the “Video Encoder H265/HEVC - hevc_vaapi (INTEL/AMD)” plugin.
Close the plugin chooser pane and select the plugin, then enable it from the options menu.

Main plugin screen with options menu
Next, we’ll need to configure your desired video quality, as the default might be really bad (it was on my GPU+driver combo). To do that, just click the button next to the checkbox, which will open a “plugin info” panel. Head to options settings, tick the boxes that say “Enable VAAPI HW Accelerated Decoding?” and “Write your own FFmpeg params”. Now you can pass a quality option to the “Write your own custom video options” box. I chose qp:v 21 . The 21 is roughly equivalent with the values you’d pass to the Constant Rate Factor (CRF) when encoding normally with ffmpeg . You’ll need to find you sweet spot though experimentation though. Lower values should yield better quality but typically increase file size.
Once you configured your plugin, you’re pretty much set! Head back to the home-page and re-enable the workers from the “Options” menu in the worker pane. If you want to force Unmanic to re-scan your library, you can do that by maximizing the “Pending Tasks” pane and then selecting the “Rescan library now” option from it’s “Options” menu.
Helpful links
- Unmanic’s GitHub: https://github.com/unmanic/unmanic
- Unmanic’s Documentation page: https://docs.unmanic.app
- Debian’s Hardware Acceleration page: https://wiki.debian.org/HardwareVideoAcceleration
- ArchWiki page about VA-API: https://wiki.archlinux.org/title/Hardware_video_acceleration